After yesterday’s debacle, it was a relief to find that fusing fine silver links came back just like riding a bike.
Note: The rest of this post is a technical description of the fusing process. Feel free to skip down to the pictures!
First, I switched torches from my usual oxy-propane to one that just uses propane. The flame is not as hot and it’s easier to control for this process.
Then I laid out my links on the special dedicated soldering board that I use only for fusing, so it stays clean. Setting up the links means butting up the ends precisely, so there are no gaps. I put them on the board so that the joins are all oriented the same way, at the top.
For the actual fusing, I dim the room because it’s easier to see what’s happening. One link at a time, I take the torch in quick little circles around the circumference until first I see the join as a little red line, then the line disappears and that one’s done. At least, that’s how it’s supposed to work. There are always a few that fail, for whatever reason. Those go into the fine silver scrap bin.
Then I oval out each one with half-round pliers as I take it off the board. This is why the orientation when I laid them out is so important. For the chains I make with these links, I want the joins in the middle of the oval because they are a potential weak point and that’s where the least amount of stress will be. So because I know where the joins are, making the ovals correctly is easy.
One board’s worth of links was enough for one day. I’ll do another one tomorrow.
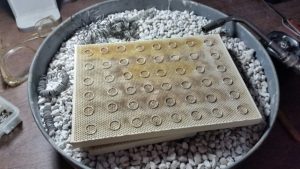
Fine Silver Links Ready For Fusing
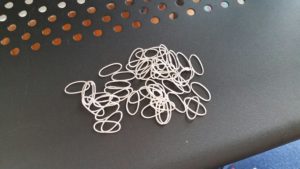
Fine Silver Links, Fused & Ovaled